|

Butter Churn
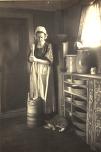
"Betty at the Churn"
|
Summary and Objective
Children will understand that butter is made from heavy cream, and the process involved in making it. They will have an initial experience in writing instructions based on these understandings.
Teaching Plan
Step 1.
First have the students view "Betty at the Churn". Allow them to examine the photograph, and then ask them whether they know what the subject is doing. In a group discussion, elicit what they know about making butter. Tell students that butter is made from cream, and that one traditional way of preparing it was with a churn. (Show "Butter Churn" photograph.) Now it is generally made by machinery, but there are still other ways to make it at home. One of those methods is to shake the cream in a jar.
Step 2.
Pour about a pint of heavy cream into a glass jar. Tape the lid securely to prevent leaks. Children may sit in a circle and shake the jar vigorously-- then pass it on to the next person. After it's been around once, note changes which can be seen clearly through the glass.
This activity may be accompanied by a traditional butter churning chant.
Come, butter, come.
Come, butter, come.
Peter standing at the gate
Waiting for a butter cake,
Come, butter, come.
or,
Come, butter, come
Come, butter, come
Cows in the pasture,
Churn a little faster.
Come, butter, come.
or,
Churn, butter, churn.
Come, butter, come.
A little good butter
is better than none.
Step 3.
Continue until contents of jar have clearly separated into liquids and solids. Pour off the clear liquid (which is buttermilk, although it looks a bit different than the kind sold at the supermarket, and can be used for baking.)
Butter can be served on crackers at this point, but there are some optional additional steps that can be gone through before serving.
Step 4.
Optional steps before serving butter:
Your butter will keep longer if it is washed at this point. Add ice water and press butter with a spatula. Repeat several times, continuing to knead with the spatula, to express as much buttermilk as possible. Add salt if desired.
Step 5.
Using the interactive writing process, reconstruct the buttermaking procedure, writing it out as for a recipe.
Post it for rereading.
Step 6.
1. Try salting some of the butter, and let children try it both ways. Make a graph of who prefers salted, and who likes unsalted.
2. Discuss other activities with which children are quite familiar (eg- making a bed, making a sandwich, teaching a trick to a dog, or building a snowman). Give each child a small booklet, and let him or her try writing directions independently.
|


